|
The respirator fit test section allows a user to input the results of a employees
respirator fit test. A respirator fit test is different from a ppe inspection, in that
staff look at the fit of the respirator and factors presented by the respirator wearer,
The respirator fit test can be setup to be done on a daily, weekly or monthly basis.
The respirator fit test is set up in a number of
sections; basic information, the conditions, and fit checks.
Configuring Safety Net Respirator Fit Test lists
On a Respirator Fit Test there are 2 sections of lists that companies must maintain. They are Fit Test Checks and Fit Test Conditions. These two sections make up the
majority of the Respirator Fit Test. Companies can choose tasks from the list of Safety Net’s default respirator fit test tasks or add their own tasks to tailor their fit tests to their companies needs.
For more information about company respirator fit test lists check out the Company Fit Test Checks and Company Fit Test Conditions section of the manual.
Respirator Fit Tests also allow companies to include explanation paragraphs that can be included on the respirator fit test form. To view the Company Description Paragraphs click here.
Setting up how often respirator fit tests should occur
How often respirator fit tests must occur is a function of your companies policy regarding respirator fit tests. To configure Safety Net for how often respirator fit test should occur can be configured in the company safety settings.
Management, Office Staff and Safety Officers can edit how often respirator fit tests should occur in the Company section when they edit the Company Safety settings.
For more information about company safety setting check out the Edit Company Safety Settings in the Company section of the manual.
The respirator fit test inspection section is only available to users that have respirator fit test section turned on for their users group.
To change users access to respirator fit tests, management and office staff
can change access in Application Section to view the information about the Application Section Click Here
|
|
|
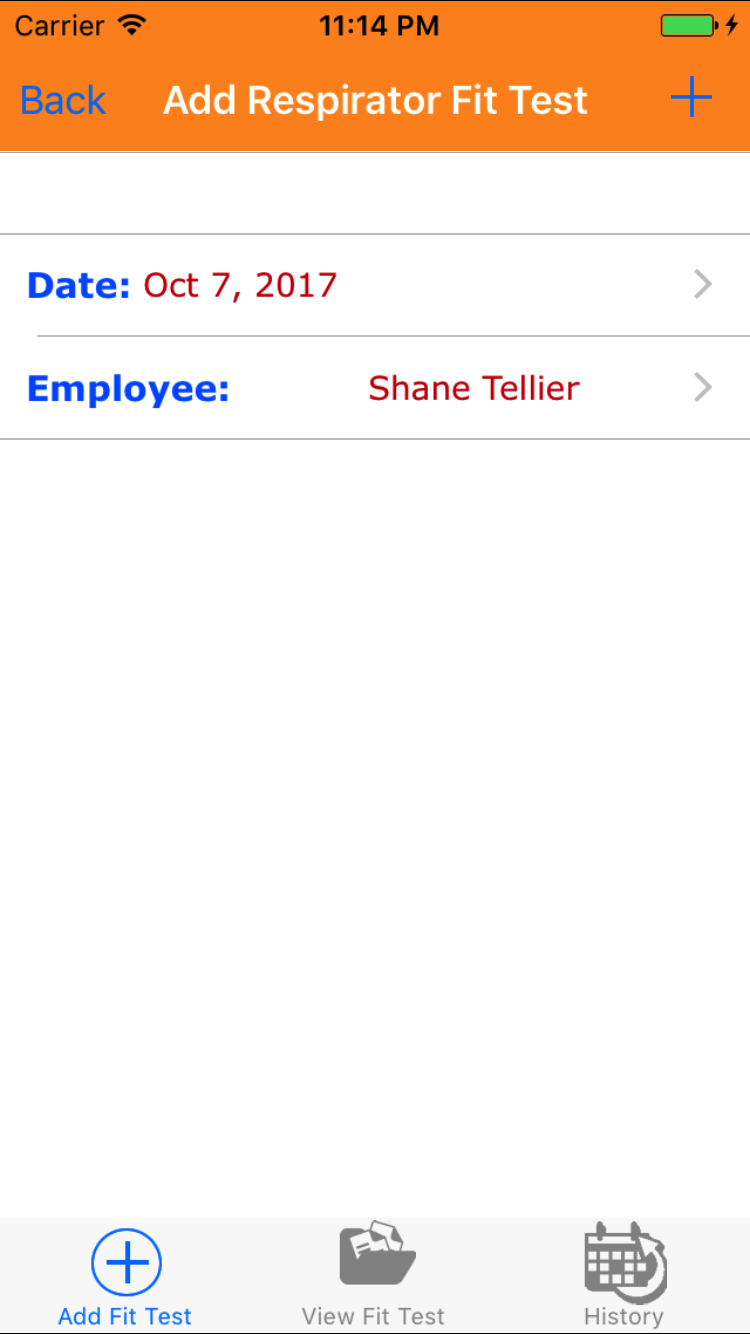
1.Add Respirator Fit Test |
Steps
- From the Main Menu screen, tap the Inspection button.
- Then tap on the Vehicle Inspection button.
- This opens the Add Respirator Fit Test entry screen.
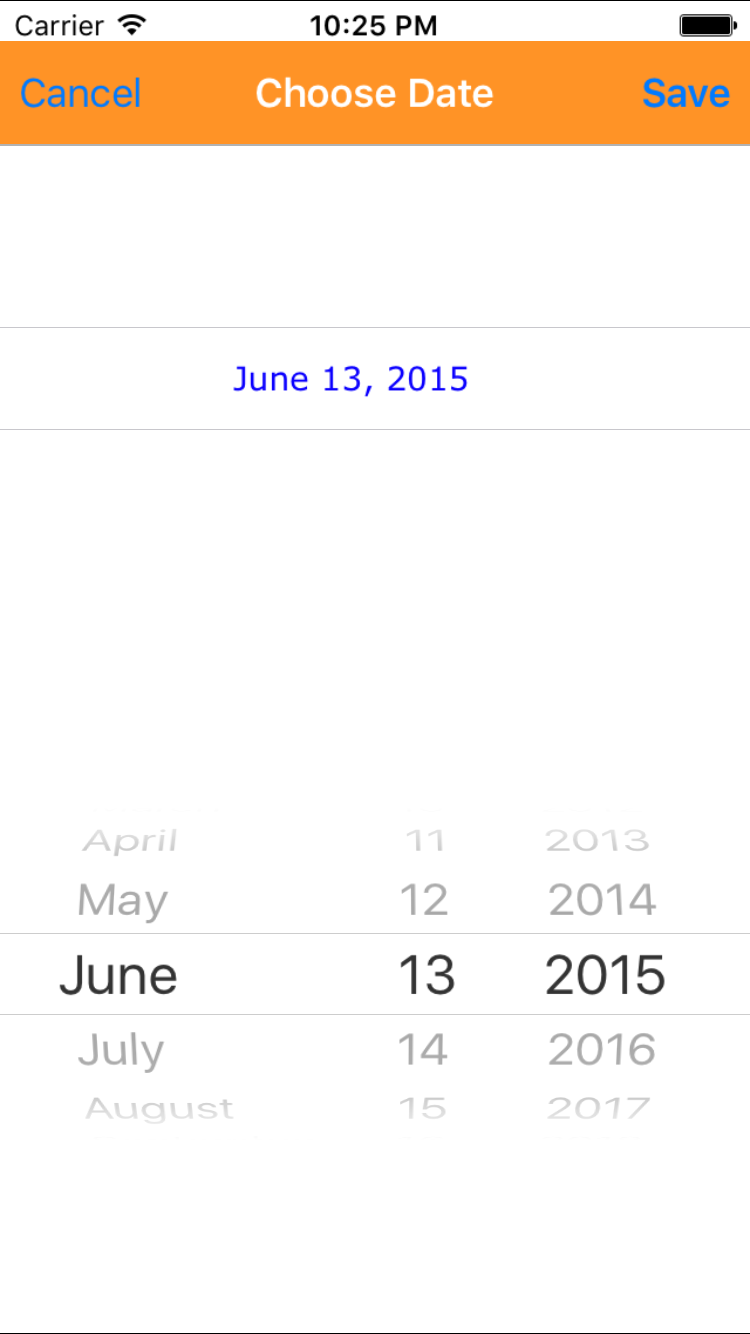
- Date: The date field allow field staff to choose the date and time the vehicle inspection occurs.
- Tap the Date field to open the Choose Date Time screen.
- Scroll the date wheel on the far left of the screen until the desired date is highlighted.
- Return to the Add Respirator Fit Test screen by either tapping Save in the top right corner to select the highlighted date or tapping Cancel in the top left corner to leave the Date: field unchanged.
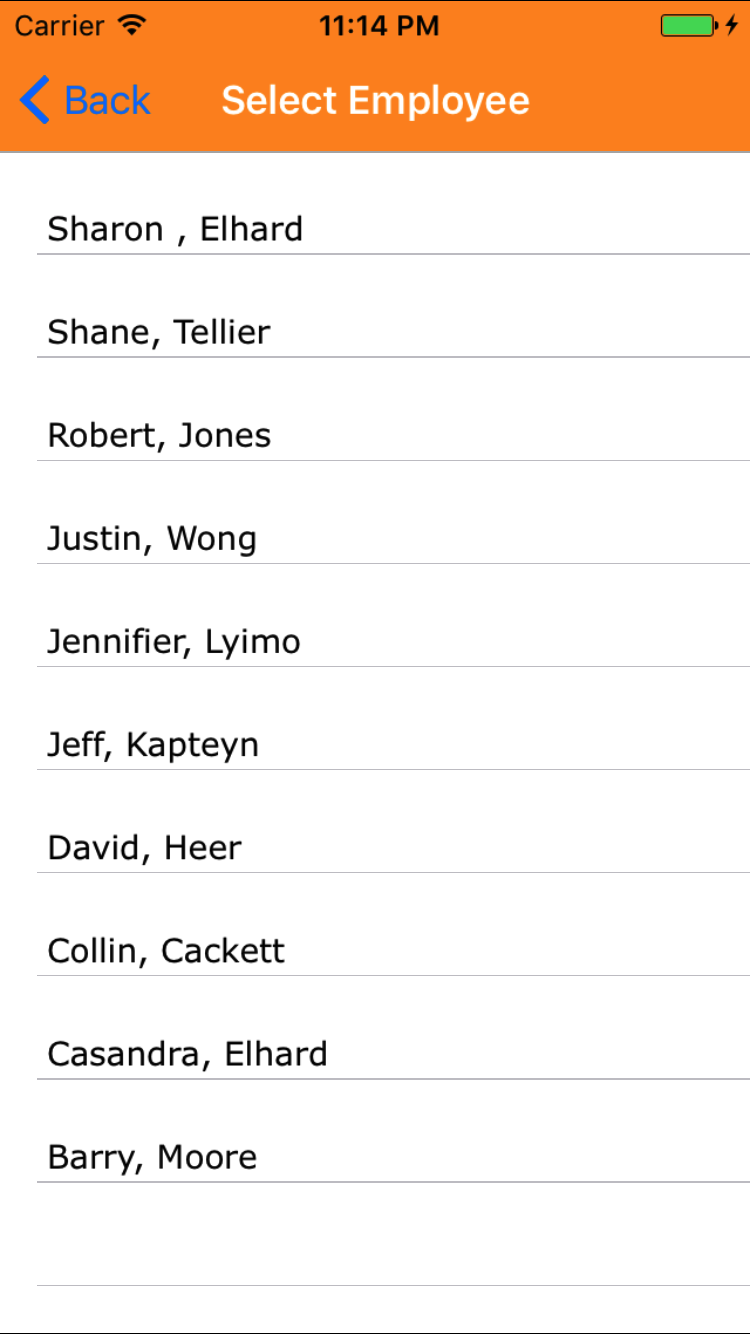
- Tap the Employee field to open the Choose Employee screen.
Employees are listed in descending order with the employee name in black text.
Note: Employees are not automatically added to the list when they are created, so it may be necessary to update the list click here to view information about updating for the desired employee to be included in the list.
To Search Employees: Pull down on the list view, the search is defaulted to search by last name.
The other option for the Employee search is by first name. Enter your search
criteria and click the Search button.
- Scroll the list of employee until the desired employee is displayed on the screen.
- Tap the desired employee to select it or tap Back in the top left corner to leave the Vehicle field unchanged and return to the Add Respirator Fit Test screen.
- Return to the Add Respirator Fit Test screen by either tapping the appropriate employee or tapping Cancel in the top left corner to leave the Employee field unchanged.
- Tap the + icon in the top right corner to add the Respirator Fit Test.
- A pop-up message that reads Respirator Fit Test Added indicates that the Respirator Fit Test is ready to have details to be entered and checklists of fit test tasks checked off.
|
|
| Step 1 |
|
|
| Step 2 |
|
|
|
|
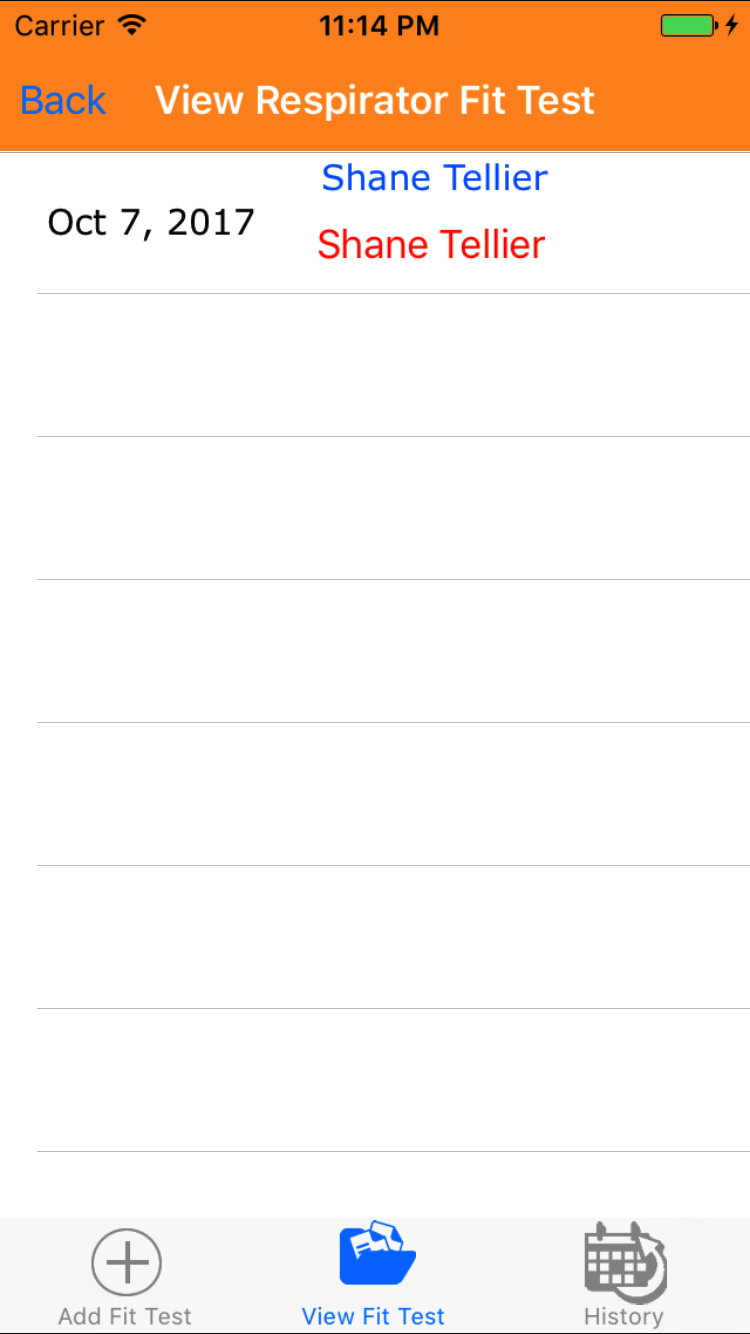
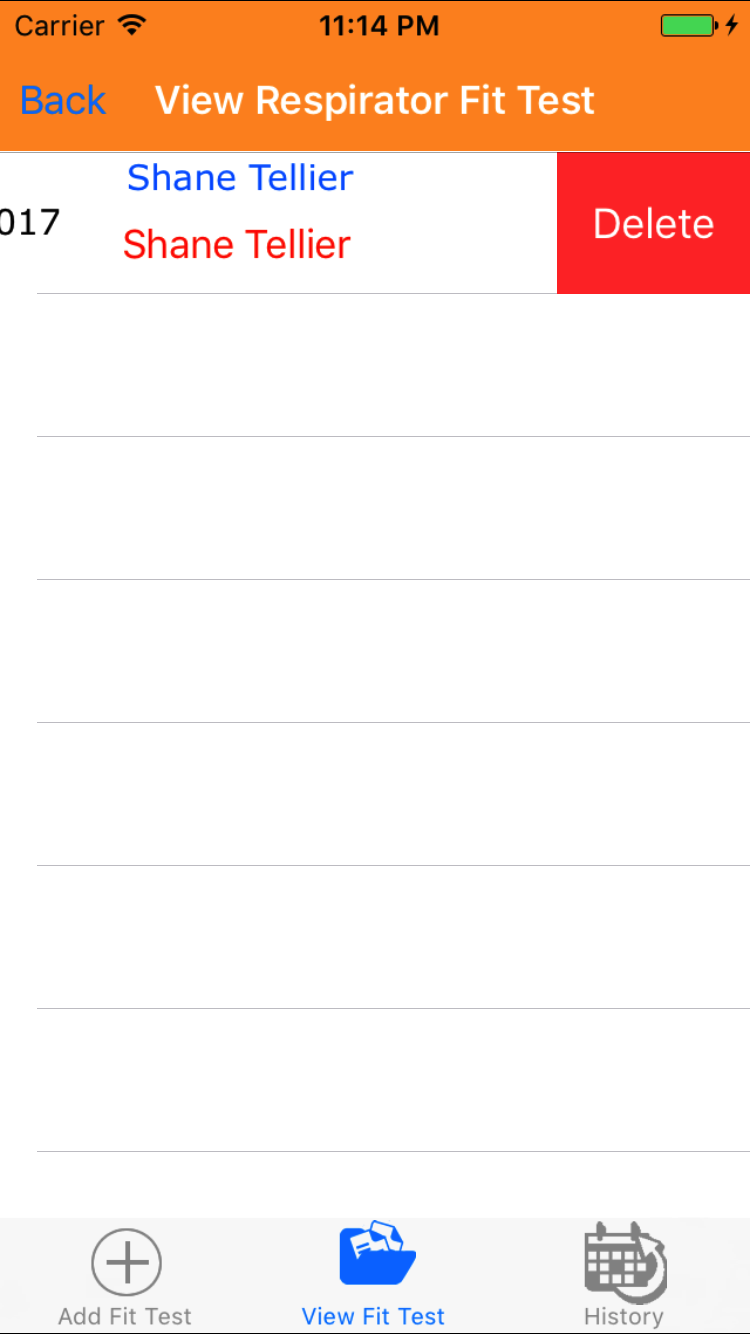
2.Look Up Open Respirator Fit Test |
|
Once in the Respirator Fit Test section
Steps
- Tap the second tab on the menu, the Respirator Fit Test view.
To Search Respirator Fit Tests: Pull down on the list view, the search is defaulted to search by date enter the date in following
format YYYY-MM-DD. The other options for the Respirator Fit Test are search by employee last name and inspector last name. Enter your search
criteria and click the Search button.
- Scroll the list of Respirator Fit Test until the desired Respirator Fit Test is displayed on the screen.
Listing the report date in black text, the employee name in blue text
and the the inspected by in red text.
- Tap on the Respirator Fit Test you would like to view. This loads the respirator fit test edit screen.
|
|
| Steps 1-2 |
|
|
3.Edit Respirator Fit Test |
|
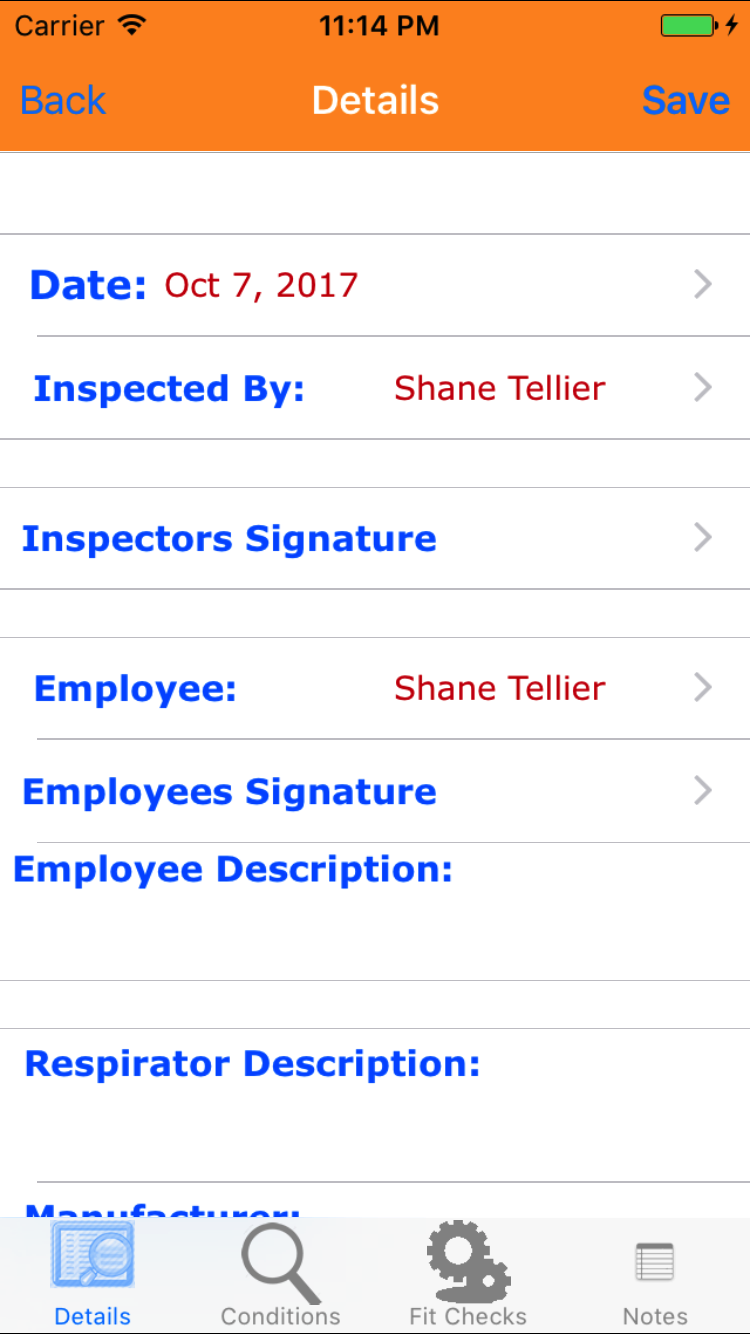
Once on the Respirator Fit Test you would like to Edit, on the details tab.
Steps
- Date: The date field allow field staff to choose the date and time the vehicle inspection occurs.
- Tap the Date field to open the Choose Date Time screen.
- Scroll the date wheel on the far left of the screen until the desired date is highlighted.
- Return to the Edit Respirator Fit Test screen by either tapping Save in the top right corner to select the highlighted date or tapping Cancel in the top left corner to leave the Date: field unchanged.
- Tap the Inspected By field to open the Choose Employee screen.
Employees are listed in descending order with the employee name in black text.
Note: Employees are not automatically added to the list when they are created, so it may be necessary to update the list click here to view information about updating for the desired employee to be included in the list.
To Search Employees: Pull down on the list view, the search is defaulted to search by last name.
The other option for the Employee search is by first name. Enter your search
criteria and click the Search button.
- Scroll the list of employee until the desired employee is displayed on the screen.
- Tap the desired employee to select them as the inspector or tap Back in the top left corner to leave the Vehicle field unchanged and return to the Edit Respirator Fit Test screen.
- Return to the Edit Respirator Fit Test screen by either tapping the appropriate employee or tapping Cancel in the top left corner to leave the Inspected By field unchanged.
- Tap the Employee field to open the Choose Employee screen.
Employees are listed in descending order with the employee name in black text.
Note: Employees are not automatically added to the list when they are created, so it may be necessary to update the list click here to view information about updating for the desired employee to be included in the list.
To Search Employees: Pull down on the list view, the search is defaulted to search by last name.
The other option for the Employee search is by first name. Enter your search
criteria and click the Search button.
- Scroll the list of employee until the desired employee is displayed on the screen.
- Tap the desired employee to select it or tap Back in the top left corner to leave the Vehicle field unchanged and return to the Edit Respirator Fit Test screen.
- Return to the Edit Respirator Fit Test screen by either tapping the appropriate employee or tapping Cancel in the top left corner to leave the Employee field unchanged.
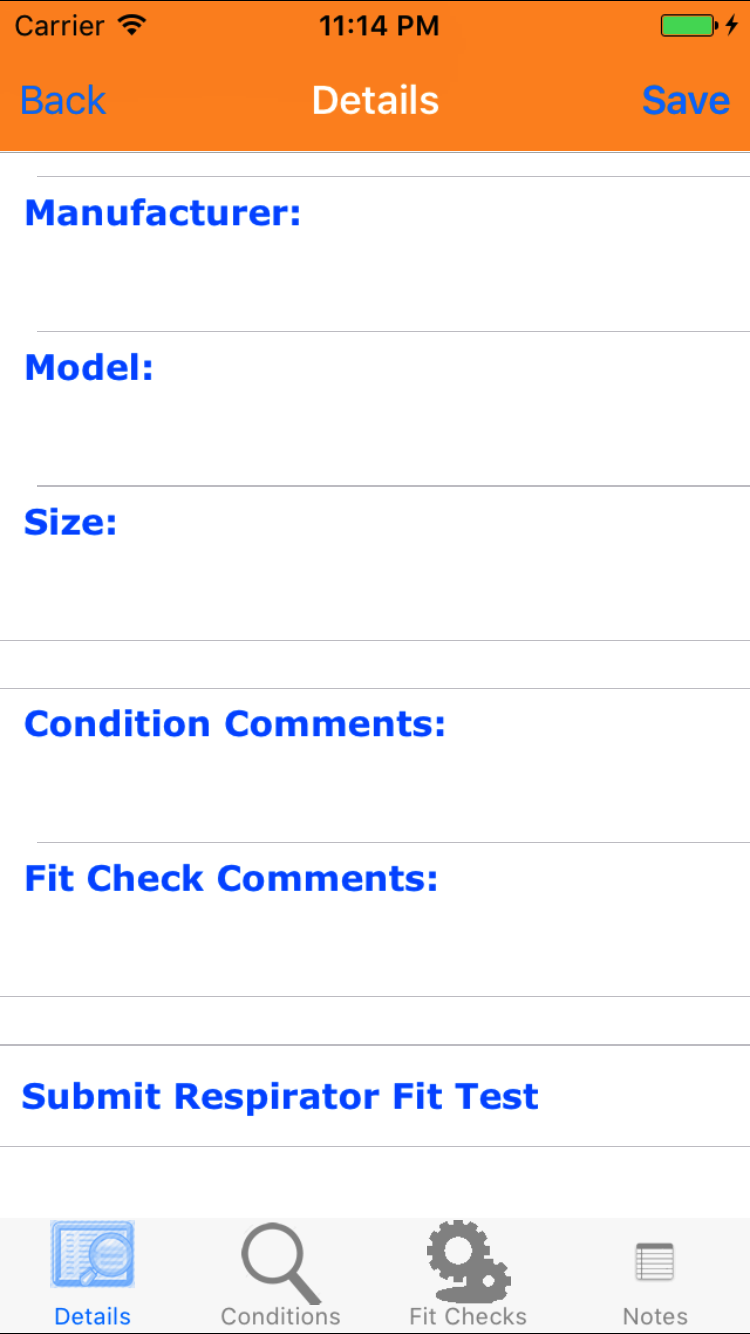
- Employee Description: The Employee Description field allows field staff to enter any description of the employee having the fit test completed for them. The character limit of the field is 150.
- Respirator Selected: The Respirator Select field allows field staff to enter a description of the respirator selected to be used having the fit test completed. The character limit of the field is 100.
- Manufacturer: The Manufacturer field allows field staff to enter the manufacturer of the respirator having the fit test completed. The character limit of the field is 100.
- Model: The Model field allows field staff to enter the model of the respirator having the fit test completed. The character limit of the field is 100.
- Size: The Size field allows field staff to enter the size of the respirator having the fit test completed. The character limit of the field is 25.
- Condition Comments: The Condition comments field allows field staff to enter comments about the conditions found on the fit test completed. The character limit of the field is 500.
- Fit Check Comments: The Employee Description field allows field staff to enter comments about the fit checks found on the fit test completed. The character limit of the field is 500.
- Tap Save in the top right corner to save any changes to the Respirator Fit Test Details.
- A pop-up message that reads Respirator Fit Test Details have been Saved indicates that the respirator fit test details have been saved.
|
|
|
| Step 1 |
|
|
| Step 2 & 3 |
|
|
| Steps 4-11 |
|
|
4.Inspected By Sign Respirator Fit Test |
|
Once on the Respirator Fit Test you would like to Edit, on the details tab.
Steps
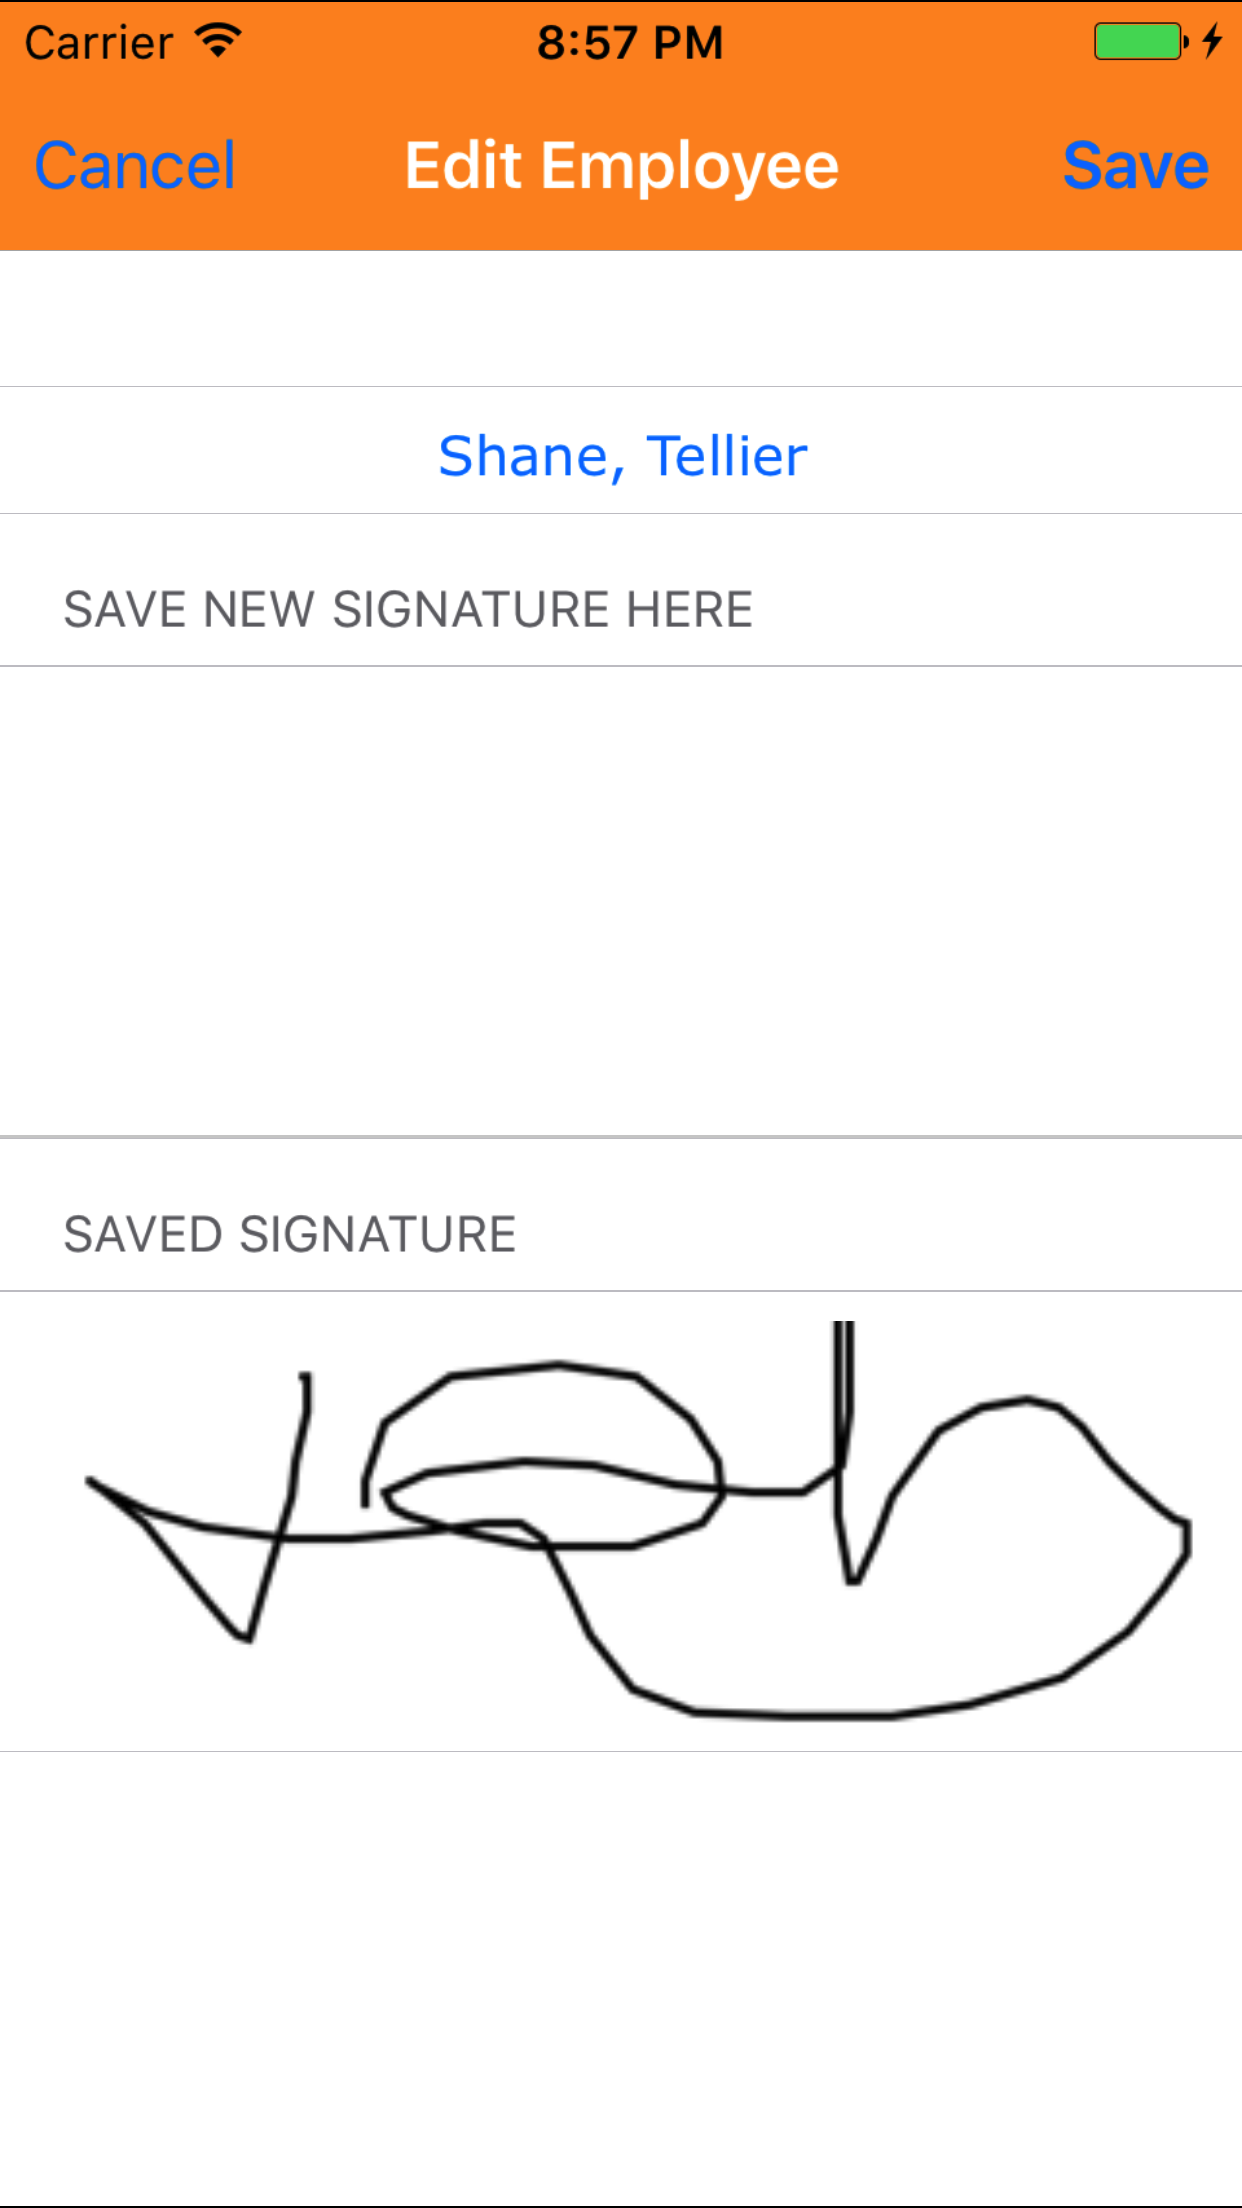
- Tap the Inspected By Signature button to open the Signature screen.
- Sign in the white space beneath the Save New Signature Here label.
- Tap Save in the top right corner of the screen to update the Saved Signature field.
|
|
|
| Step 1 |
|
|
| Steps 2-3 |
|
|
|
5.Employee Sign Respirator Fit Test |
|
Once on the Respirator Fit Test you would like to Edit, on the details tab.
Steps
- Tap the Employee Signature button to open the Signature screen.
- Sign in the white space beneath the Save New Signature Here label.
- Tap Save in the top right corner of the screen to update the Saved Signature field.
|
|
|
| Step 1 |
|
|
|
| Steps 2-3 |
|
|
|
6.Edit Respirator Fit Test Conditions |
|
Fit Test Conditions are respirator fit test conditions that a company has set up for their field staff to complete
as part of their respirator fit test. To ensure field staff have the most up to date copy of the fit test tasks a company is
using make sure to update your phone on a regular basis. For more information about updating your phone click here.
Once on the Respirator Fit Test you would like to Edit
Steps
- Tap the Conditions icon at the bottom of the screen to open the Condition Checklist screen. The screen loads
with the conditions tasks your company has created for your respirator fit test. The Condition Task
in black text. These conditions you are going to look see if any match the employee you are doing the respirator fit test for.
- Scroll the list of conditions until the desired condition is displayed on the screen.
- Tap on the Condition to change its checked status.
|

|
| Steps 1-3 |
|
|
|
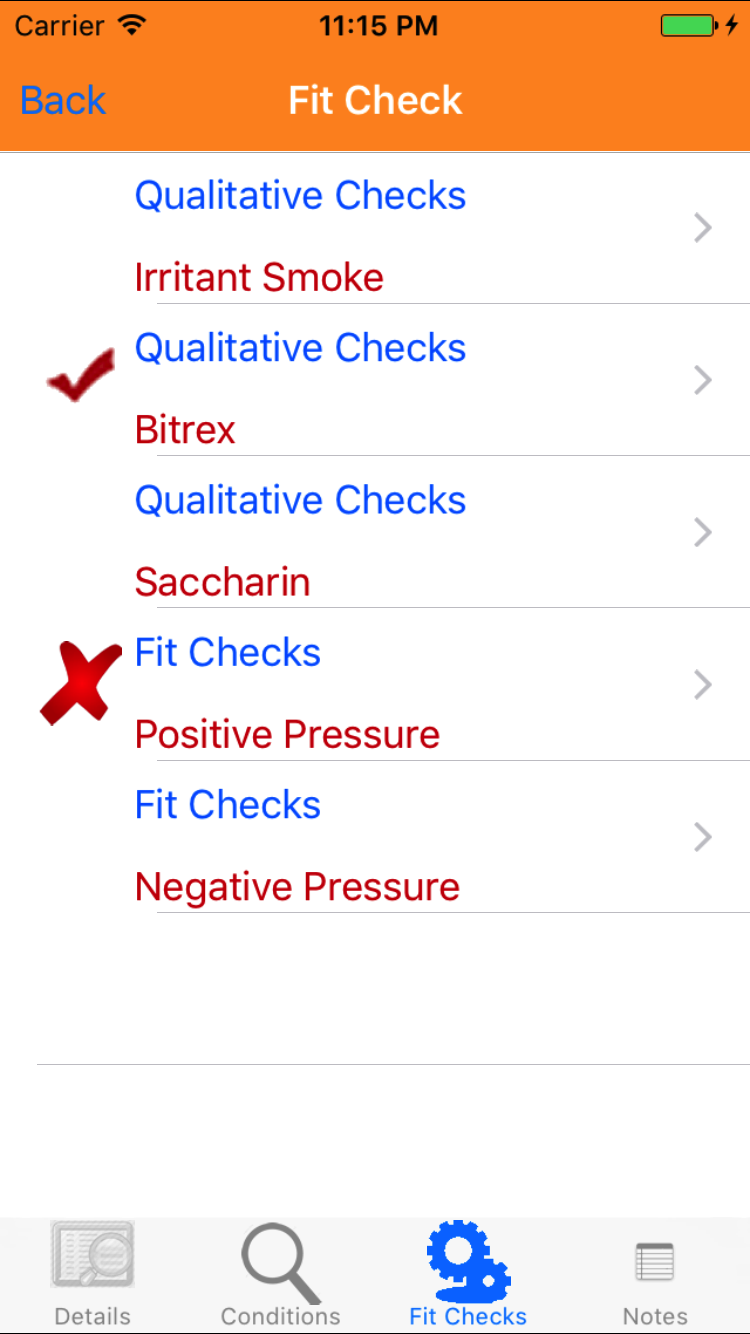
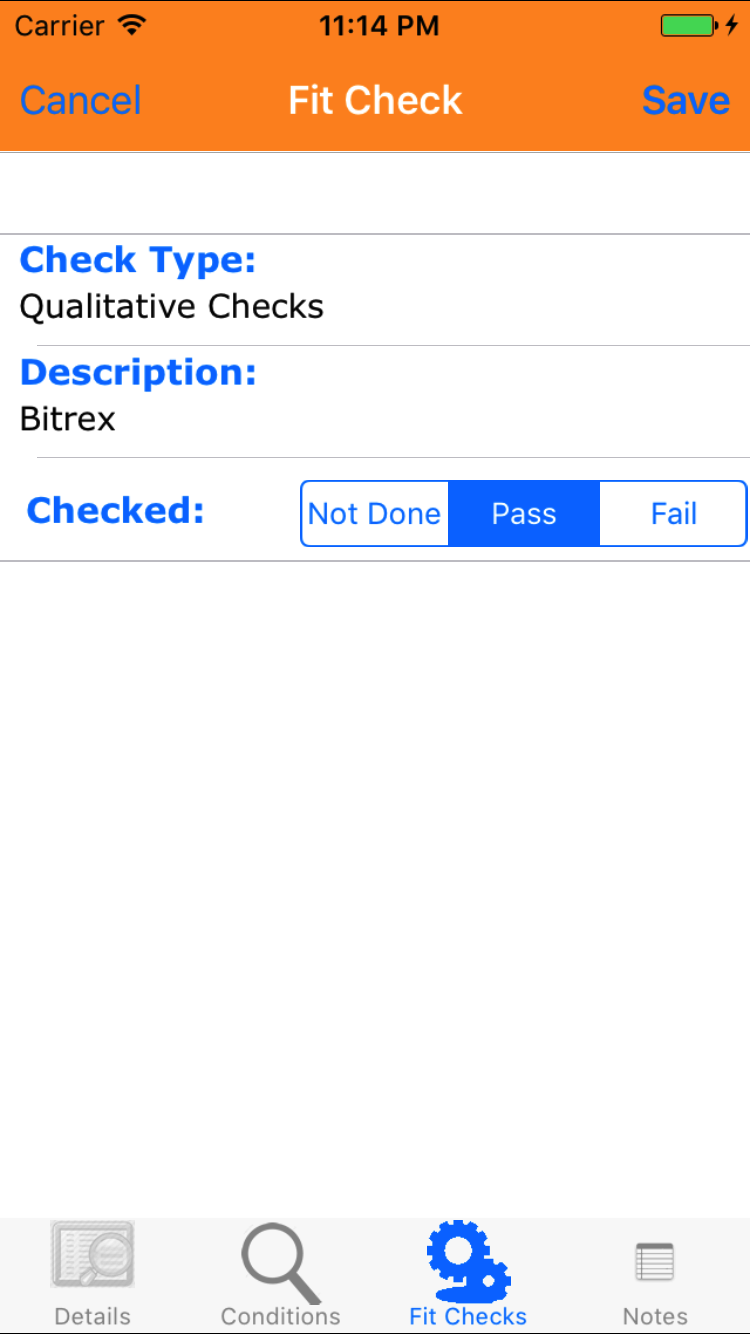
7.Edit Respirator Fit Test Checks |
|
Fit Test Checks are respirator fit test checks that a company has set up for their field staff to complete
as part of their respirator fit test. To ensure field staff have the most up to date copy of the fit test tasks a company is
using make sure to update your phone on a regular basis. For more information about updating your phone click here.
Once on the Respirator Fit Test you would like to Edit
Steps
- Tap the Fit Test Checks icon at the bottom of the screen to open the Fit Test Checks screen. The screen loads
with the conditions your company has created for your respirator fit test. The Check Type
in blue text, with the Check Description in red text.
- Scroll the list of fit checks until the desired fit check is displayed on the screen.
- Tap on the fit check, which will load the Edit Check screen.
The next screen loads with the Check Type of the fit check, and the check description at the top of the screen and the ability to change the checked
status field.
Fields
- Checked: Tap Not Done|Pass|Fail to change the status of the check task.
- Not Done: means fit test task has not been checked.
- Pass: means fit test tasks has been found to be pass.
- Fail: means fit test tasks has been found to be failed.
- Tap Save in the top right corner of the screen to save the fit test check details
|
|
| Steps 1-3 |
|
|
| Steps 4-5 |
|
|
|
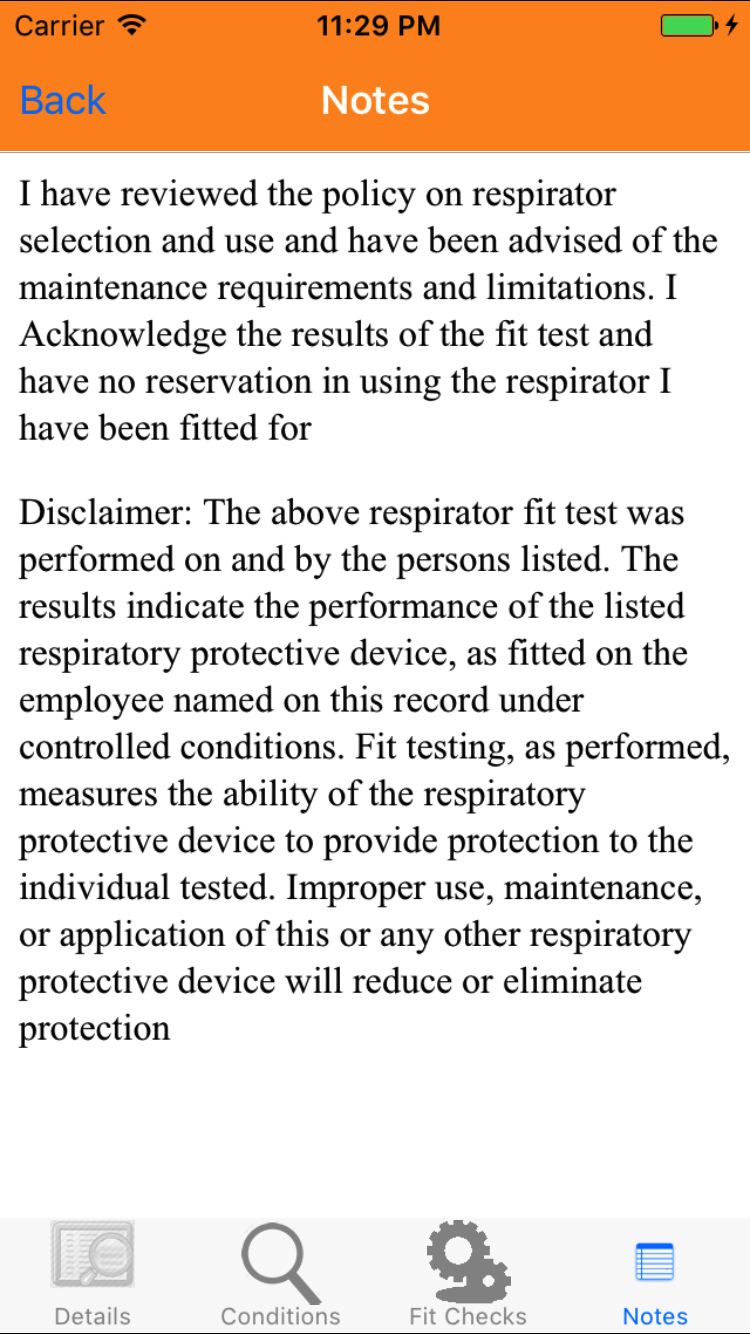
8.View Respirator Fit Test Information |
|
Once on the Respirator Fit Test you would like to Edit
Steps
- Tap the Notes icon at the bottom of the screen to open the Respirator Fit
Test Information screen. This loads with the description paragraphs of your respirator fit test form.
|

|
| Steps 1-3 |
|
|
|
9.Submit Respirator Fit Test |
|
Once on the Respirator Fit Test you would like to Submit, on the details tab.
Steps
- Tap the Submit Respirator Fit Test button.
|
|
| Step 1 |
|
|
|
10.Delete Respirator Fit Test |
|
Once in the Respirator Fit Test section
Steps
- Tap the second tab on the menu, the Respirator Fit Test view.
To Search Respirator Fit Tests: Pull down on the list view, the search is defaulted to search by date enter the date in following
format YYYY-MM-DD. The other options for the Respirator Fit Test are search by employee last nameand inspector last name. Enter your search
criteria and click the Search button.
- Scroll the list of Respirator Fit Test until the desired Respirator Fit Test is displayed on the screen.
Listing the report date in black text, the employee name in blue text
and the the inspected by in red text.
- Swipe from the right edge to the left to bring up the delete button for the respirator fit test.
- Tap the Delete button. The respirator fit test will be deleted.
|
|
| Steps 1-4 |
|
|
11.View Closed Respirator Fit Test |
|
After Respirator Fit Tests have been closed out, they will be available to look at through the History view on the iPhone Application.
Once on the Respirator Fit Test section
Steps
|
|
|
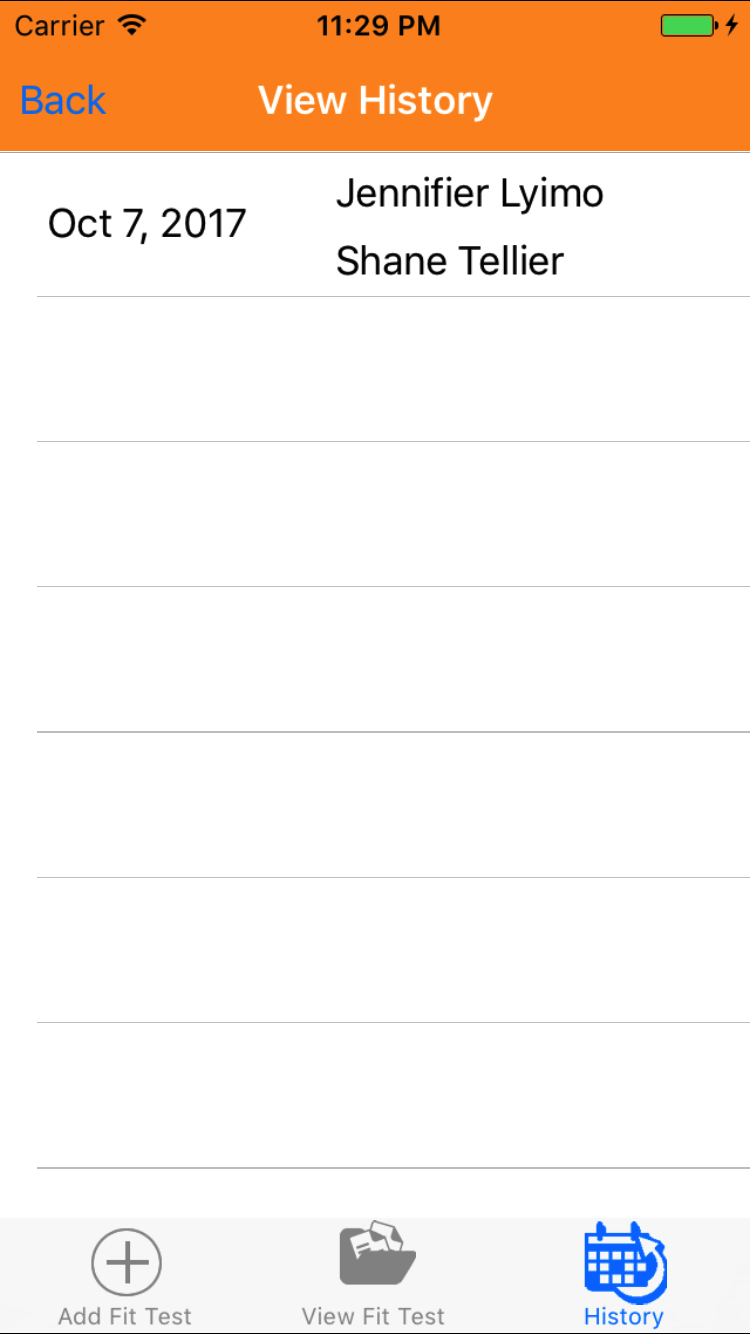
- Tap the third tab on the menu, the History tab of the main menu view. This loads with a list of the closed out
Respirator Fit Tests listing the the report date, employee inspected and employee whom inspected of the Respirator Fit Test in black.
To Search Respirator Fit Tests: Pull down on the list view, the search is defaulted to search by date enter the date in following
format YYYY-MM-DD. The other options for the Respirator Fit Test are search by employee last name and inspector last name. Enter your search
criteria and click the Search button.
- Scroll the list of Respirator Fit Tests until the desired Respirator Fit Test is displayed on the screen.
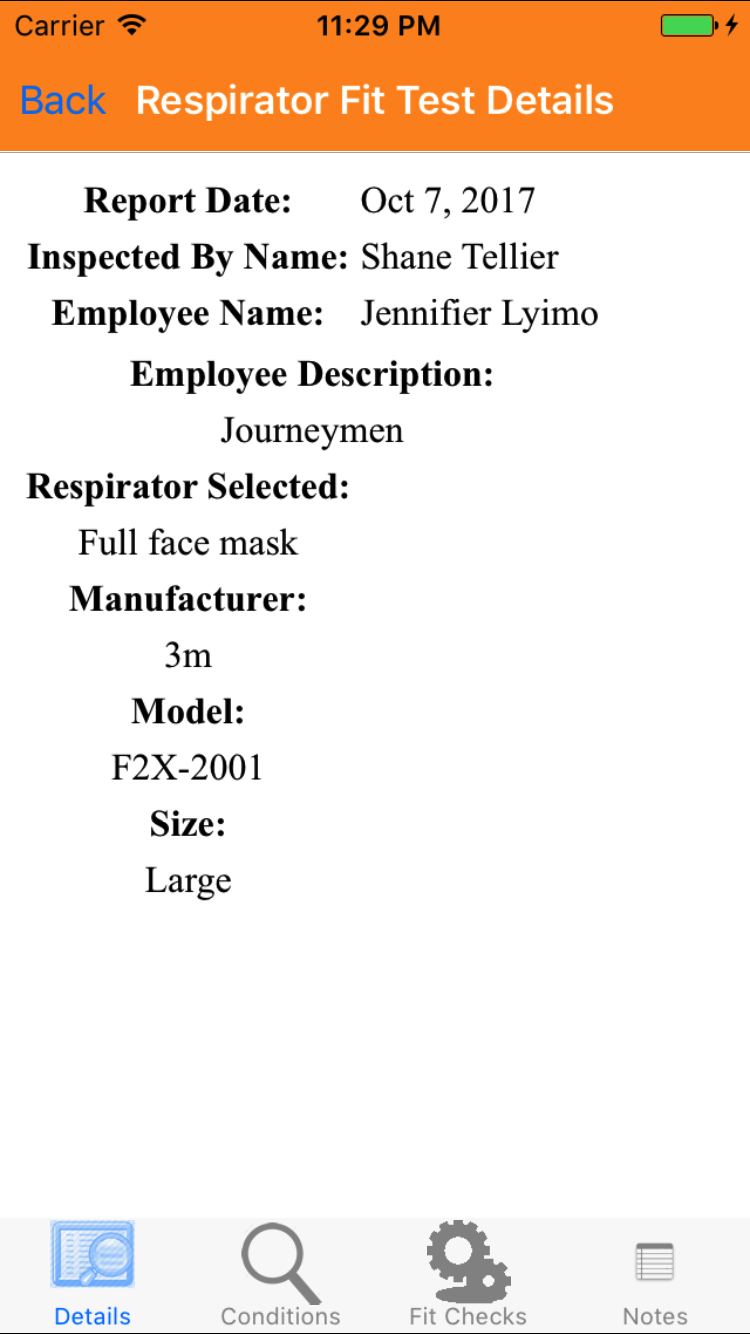
- Tap on the Respirator Fit Test you would like to view. This loads the first tab, the Respirator Fit Test details tab of the History view.
It loads the following details including report date, inspecting employee, inspected employee, description of
the employee and information about the respirator.
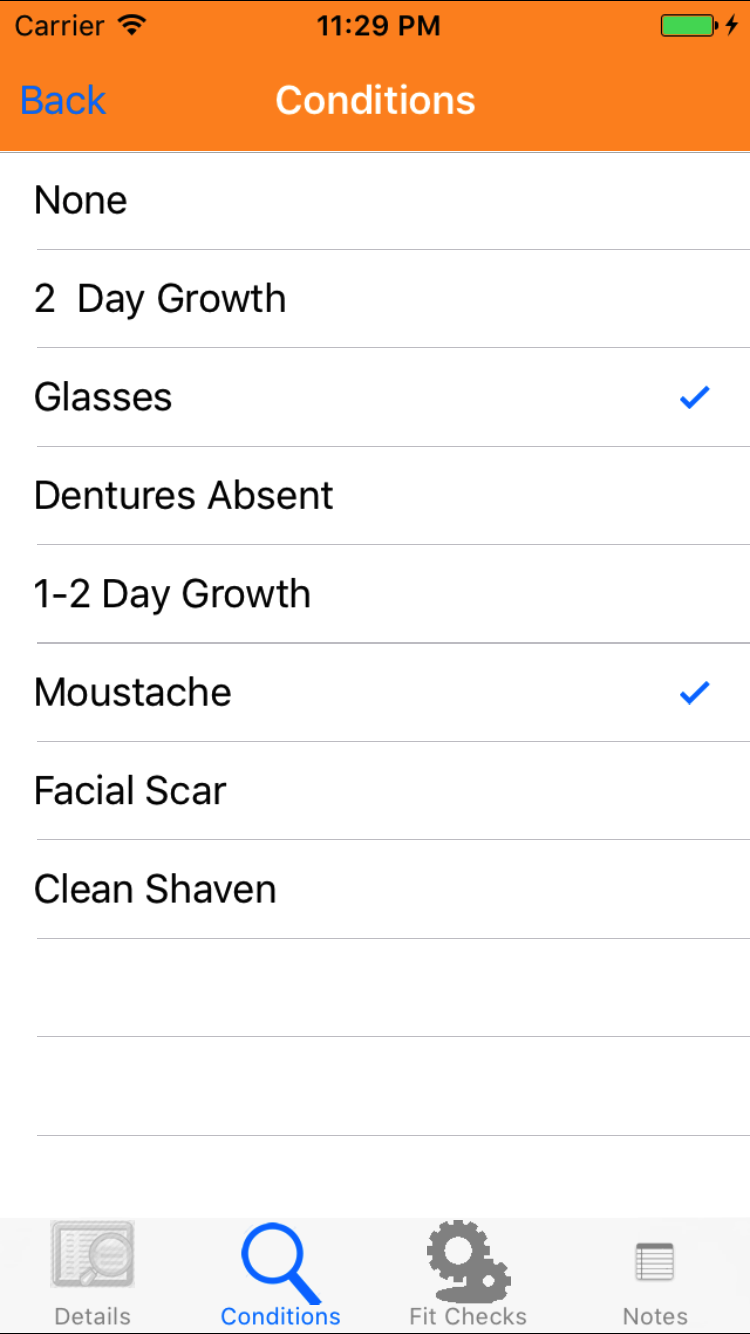
- Tap the second tab, the Fit Test Condition's tab of the History view. This loads with the conditions name and if the conditions are checked or not.
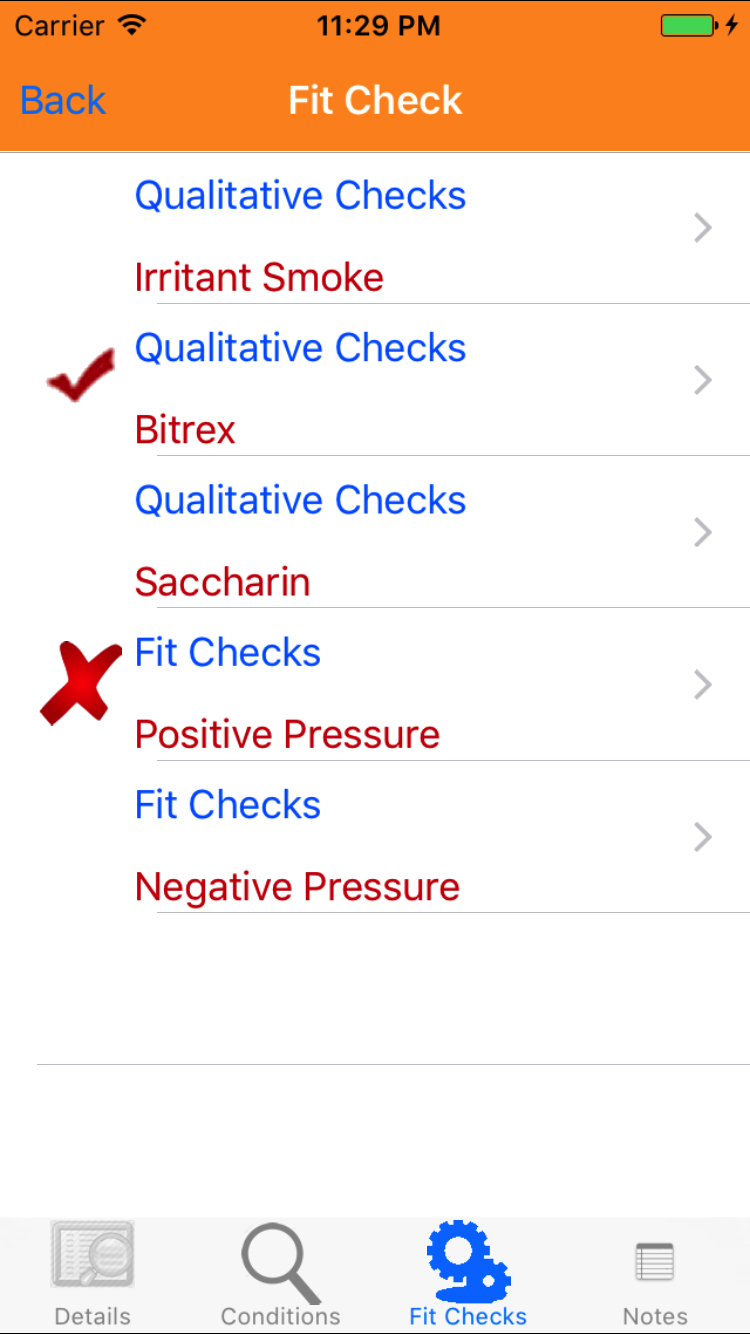
- Tap the third tab, the Fit Test Check's tab of the History view. This loads with the check type,checks name and the status it was marked.
- Tap the fourth tab, the Respirator Fit Test Information tab of the History view. This loads with the description paragraphs of your companies fit test form.
|
|
| Steps 1-2 |
|
|
|
|
| Step 3 |
|
|
|
| Step 4 |
|
|
|
| Step 5 |
|
|
|
| Step 6 |
|
|
|
12.Update Respirator Fit Tests |
|
To ensure field staff have the most up to date copy of the respirator fit test form a company is
using and tests in the companies make sure to update your phone on a regular basis. For more information about updating your phone.
Steps
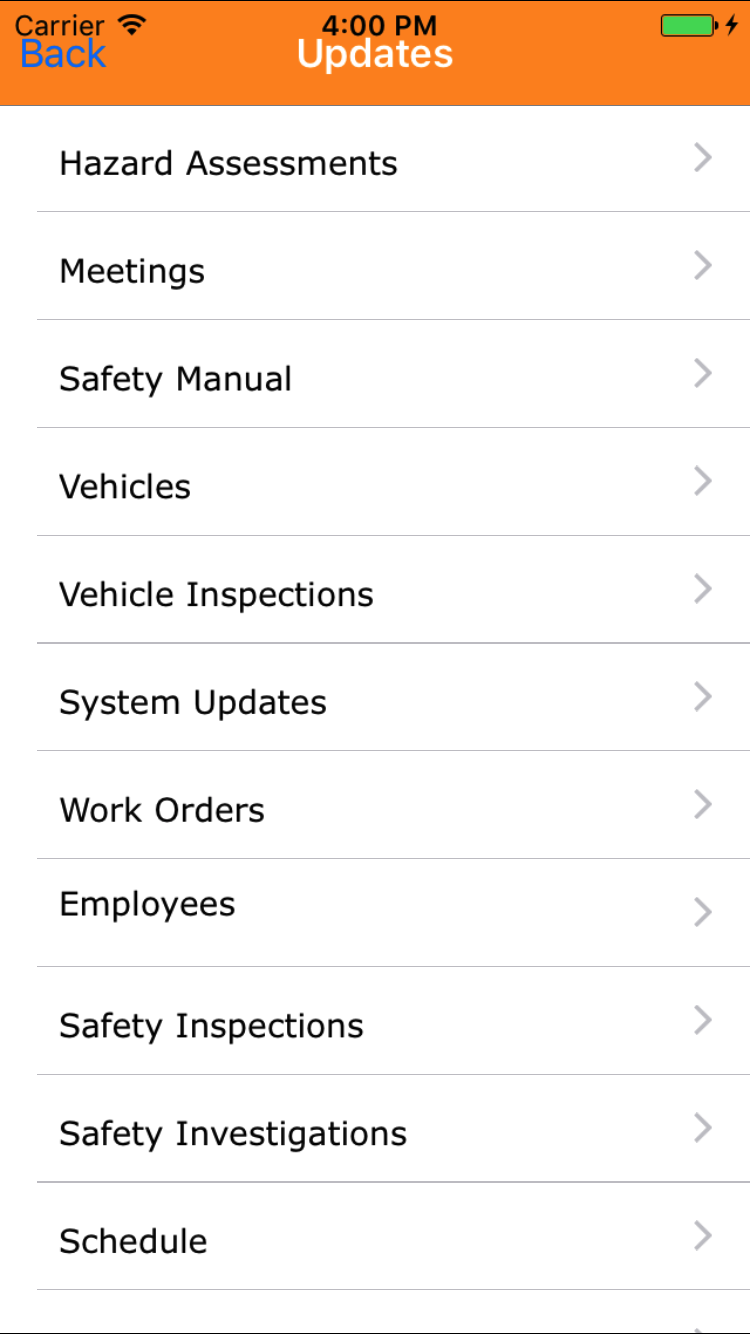
- From the Menu screen, tap the Updates button.
- Scroll the list of sections until you find the Respirator Fit Test button.
- Tap on the Respirator Fit Test button.
|
|
|
|
| Step 1 |
|
|
| Steps 2-3 |
|
|